
Baking cookies for Halloween, especially these creepy skull cookies, always reminds me of the time that Gavin, my oldest, got the biggest BOO of his life!
He was four years old and trying to digest all of the goblins and ghoulish figures dangling around our neighbor’s homes. As long as he felt the comfort of our large group walking around, he was content enough filling his little basket with newfound candy.

We came to the very last house on our route. When we knocked on the door, we noticed that it creaked open but no one was in sight. Then, six-foot-tall skeleton jumped out and shouted “BOO!”
Poor Gavin shrieked loud enough for the entire neighborhood to hear. Not just an “I’m scared” crying, but a terror-in-the-night wail. Our neighbor immediately took off his mask and tried to calm Gavin down, letting him see that he wasn’t a real monster, but alas the damage was done. “Skulls” and “Boos” would never be the same for him….until now.

This post is really a tribute to the years of psychological damage my child endured that night.
Just kidding! Gavin did calm down when he realized that when you cry, people will give you a WHOLE LOTTA CANDY to make you stop (especially if they’re the neighbor who scared you in the first place). And there you have it, a silver lining for skulls and boos.

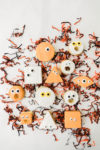
I tracked down my dear friend Juan and asked him if he could help me decorate some creepy skull cookies. Juan is one of our featured street artists from our Graffiti & Grace series, all about edible urban art.
The dude can depict terror on a cookie almost as well as my neighbor did that night so many Halloweens ago. For these cookies, he skipped the airbrushing and used edible markers and food coloring for decorating.

For the cookie itself, you will need:
- Sugar Cookie Dough Recipe – Try our fave sugar cookie recipe. It’s simple and a classic! You can spice up the cookie, if you would like, with cardamom or citrus zest.
- Cookie Cutters – There are many on the market, but I love this Boney Anatomical Spooky Halloween Skull Cookie Cutter from Fussy Pop. The cutter is made from copper and it serves as a great Day of the Dead skull, too! It is 3″ x 4.5″ which is the perfect-sized palette to do some mean damage.

For the Royal Icing technique, you will need:
- Royal Icing Recipe – Try The Sweet Nerd’s favorite, royal icing recipe. Also, there is a 10-second rule I like to use when trying to figure out the consistency for ‘filling’ your creepy skull cookies.
The secret here is balancing droplets of water and the thickness of your icing. Check by dragging the tip of a spoon or knife through the icing (1″ deep) and count to 10. If the surface smoothes out when you get to 10, you are golden. If it takes too long, add a tad bit more water and re-test. If it stirs too quickly, add a bit more sifted icing sugar to thicken it. Once you’ve passed the text, it’s time to prep the bag with an Ateco#2 or #3 tip, and put the icing in a piping bag. Tip: while I’m frosting the cookies, I keep my icing bags covered with a wet paper towel so the tip won’t dry out.
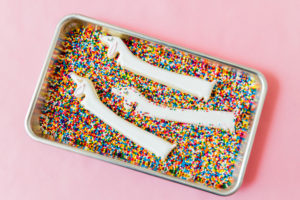
Next, we have the flooding technique. To start off, create an outline. Fill in your outline (i.e. flood it) and use a toothpick or metal pick to help fill in any holes (see video). Lastly, decorate with sprinkles or more advanced decorating techniques that inspire you. Has your patience been tested enough yet?!? It’s very possible! Just remember to breathe. You got this!
Now for my favorite part, where you get to be a creative genius and decorate all the creepy skull cookies you can make. I use Edible Markers, Americolor Food Coloring, and Edible Metallic to brighten the white.

Happy Decorating, My Ghoulfriends!
Photos by: Maria Hedrick Photography
Cookies 1Dries: Whisk flour and salt in a bowl. Set aside. 2Base: In a mixer, cream together butter and sugar. Next, add eggs, vanilla and optional flavorings of citrus zest or spices (ie: cardamom). 3Gradually, add dries to base just until incorporated. Chill in refrigerator up to one hour. Roll on lightly floured surface. Cut shapes. 4Bake at 350F for 8-10 minutes or until edges are slightly browned. 5Note: When you cut into a shape, chill in freezer to set. Then, transfer directly to hot oven. Tip: Once you cut your cookies into your desired shapes, wrap and place in freezer. Then, bake off the next day. Move from freezer to oven and the shapes will retain their integrity during the baking process. This is how you get those perfectly shaped cut-out cookies!
Directions


LET’S BAKE TOGETHER!
Don’t Miss A Recipe


Poor Gavin! We’ve done some damage to our boys over the years that they’re still recovering from (i inadvertently locked them in an outdoor shower from the outside – whoops). Max still can’t fully close the bathroom door. But you definitely made up for Gavin’s fright with these cookies. There’s nothing that butter and sugar can’t fix! Love these!