
Double, double toil and trouble…! Halloween is one of my most favorite occasions for decorating – anything and everything. That means creating incredibly cute and spooky treats for kids and adults, when my boys start brainstorming on what their ultimate halloween costume will be this year (that’s also me calculating in my head how much time and money this year’s outfits will cost!), and it means we’re in the thick of the fall season. Whew and yay! There are literally hundreds of Halloween cookie recipes that I want to share but here’s one of my top choices – Spider + Cobweb Sugar Cookies. It’s perfect when your little ones have a Halloween party at school. They are a bit of time, but oh so worth it when I see my kids FREAK-out when they see them all decorated. Honestly, even if you just plopped down eyeballs, they go cwazzy-town.
HERE IS THE DEALIO FOR SUGAR COOKIE NEWBIES
- Cookie Dough: Make – Roll – Cut – Bake
- Royal Icing: Make – Color – Bag (piping bags that is with tip and coupler)
- Piping Technique: Outline – Flooding – Wet-on-Wet technique
- Garnish: Eyeballs – Sanding Sugars – Edible Glitter
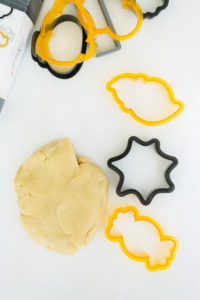
SELECT YOUR CREEPY CRAWLY COOKIE CUTTERS
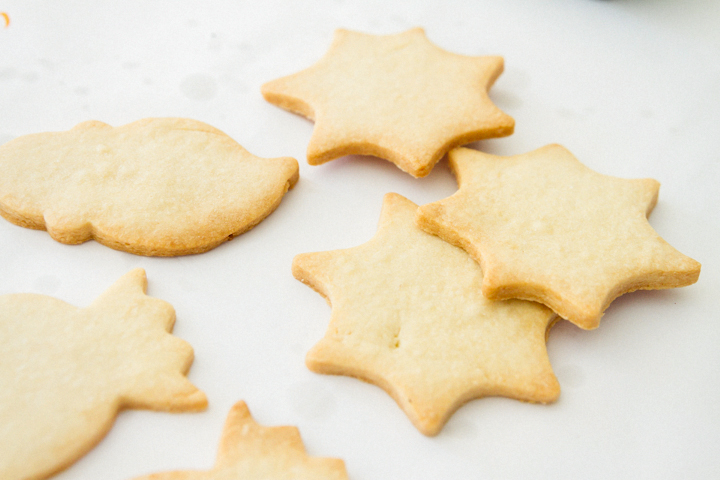
THE PERFECT SUGAR COOKIE
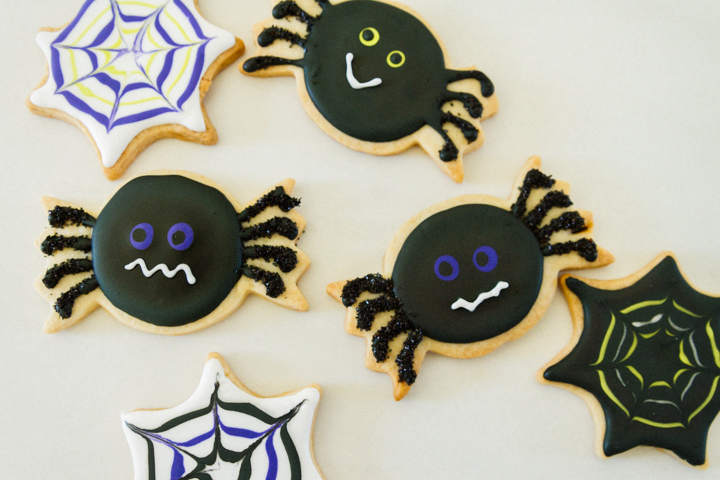
SPOOK OUT THOSE SPIDER + COBWEB SUGAR COOKIES
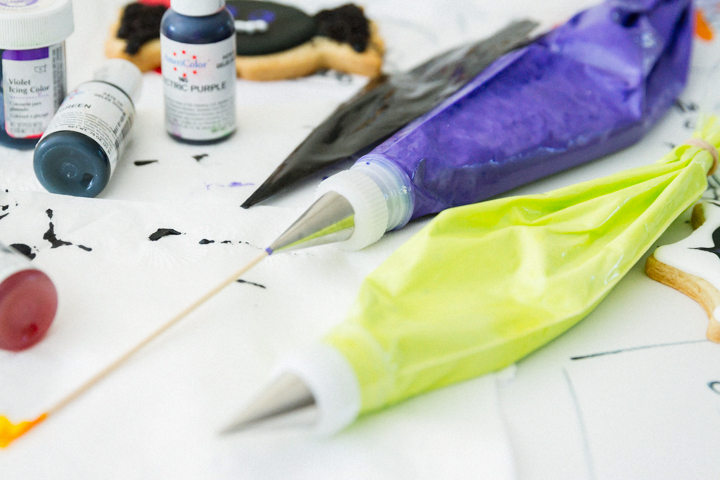
It’s royal icing time! Grab a bunch of confectioners’ sugar because you’re going to need it. I’m talking two pounds worth, but it’ll make just the right amount of royal icing for loads of cookies (more than you will need on this round, but it will keep in the refrigerator for 2-3 weeks). Once you’ve mixed up a big batch of white icing, take out a handful of fun Americolor gels to mix into smaller batches so you can start decorating. Portion out a hefty size of black icing for the spiders, pouring it into a piping bag and using Ateco or Wilton tips number 1 and or 2.
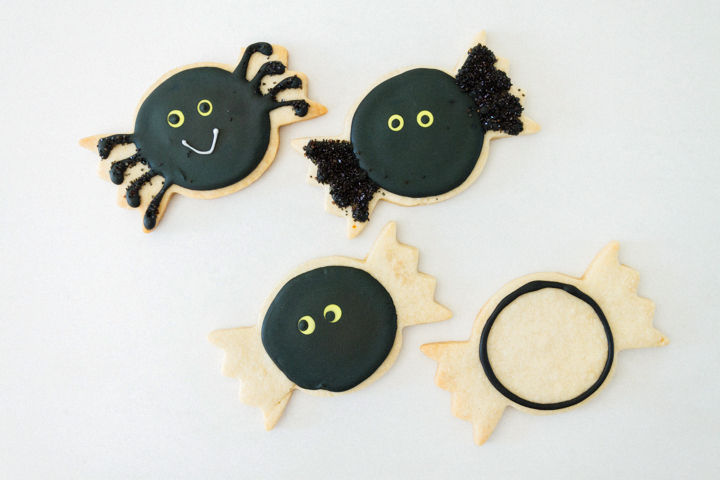
SPIDER
Start by outlining the spider body with a circle, then fill in. Grab another piping bag with yellow or blue icing and create two dots for the eyes. Go back and place a tiny dot in the middle of each eye to create a pupil. Wait for it to dry. Next, draw four legs on each side of the spider body with the black icing, then sprinkle the legs with black glitter. Let it dry slightly, then gently shake off and let cookies completely dry. Have fun with the spider’s mouth – as you can see mine are having all kinds of emotions.
WEB
For the spider webs, outline each cookie with white icing, then fill in completely. Grab another piping bag with blue icing and draw two circles – one large and one in the middle. With your other piping bag of yellow icing, draw two circles in between the large and middle sized circles. Immediately, after you flood, use a toothpick to draw lines outward from the center and away towards the last circle, creating a web effect. Allow to dry completely. Feel free to play around with other colors as well.
So, keep this fun Spider + Cobweb Sugar Cookies recipe in mind for an upcoming kids halloween party. They’re sure to be a big spooky hit!
OUR FAVES
- Sweet Sugar Belle, Sugar Cookie Master
- The Bakers Party Shop, Sweet Sugar Belle Cookie Cutters
- Surfas, Sanding Sugar
- Americolor, Amazon
- Layer Cake Shop, Sanding Sugar
Photos by: Maria Hedrick Photography
October 5, 2018 Sugar Cookies 1Dries: Whisk flour and salt in a bowl. Set aside. 2Base: In a mixer, cream together butter and sugar. 3Next, add eggs, vanilla and optional flavorings of citrus zest or spices (ie: cardamom). 4Gradually, add dries to base just until incorporated. Chill in refrigerator up to one hour. Roll on lightly floured surface. Cut shapes and refrigerate to chill. 5Bake at 350F for 8-10 minutes or until edges are slightly browned. Note: when you cut into a shape, chill in freezer to set. Then, transfer directly to hot oven. Royal Icing (shared from Sweet Sugarbelle) 1Add vanilla flavoring into 1/2 cup water and set aside until step 3. 2In the mixer (paddle attachment), gently mix confectioners sugar and meringue powder on low. 3Add 1/2 cup flavored water and mix on low until it is thick and lumpy. 4Drizzle the remaining water as needed until it becomes a thick like honey consistency. 5Turn mixer on medium speed for 2-3 minutes or so until icing is thick and fluffy. Stop when it forms a soft peak. If you are not using immediately, keep stored in airtight container. 6Separate into mixing bowls and adding 1/2 teaspoon at a time until icing becomes thin and a '10 second consistency', meaning threads of icing fall off a spoon and are absorbed completely back into the icing within 10 seconds. 7Now add Americolor gel drops, one at a time until you get the desired color. 8Load your piping bag, and get ready to make some fun sugar cookies. 9Tip: place a toothpick on the end of the Ateco or Wilton tip to avoid air from drying the royal icing. 10Spider: Start by outlining a circle in the middle, then flood with black. Immediately create eyes by filling a two small circle eyes, then add in black pupils. Let dry. Pipe black legs and immediately pour over black sanding sugar. Let sit until dry. Then scrape off with toothpick the excess black sanding sugar. Finish by adding mouth detail (atop dry black body). 11Web: Start by outlining the web shape, then flood with white. Make two circle rings alternating purple and green inward then outward. Then immediately with a toothpick 'pull' the wet icing from the center outward to create the webbed look.Creepy Crawly Cookies
Directions


LET’S BAKE TOGETHER!
Don’t Miss A Recipe


These are quite adorable! I can’t wait until my niece is old enough to bake with me for the holidays.
Thanks Kendall. So glad you like them.
These are so cute and bound to be a BIG hit with the kiddos and adults!
Awww, I love the spiders. They are too cute!
These cookies are absolutely adorable!!!! My niece and nephew would absolutely flip over these, so I’m sending the link over to my sister! Cheers, girl!
Oh for sure… my nieces and nephews are all older, and they still freak out over them!
I’m making these for my kids for sure – I know my 5 year old AND my 12 year old will love. Thanks for the great sugar cookie recipe too. 🙂
Thanks Tessa. Please let me know how they turn out.
Yikes!!! Spiders are terrifying, but these look like the ONLY case in which I’d allow them anywhere near me. The design you make with the webs is so pretty too – love it!
Terrifying is right, until you eat one of course.
So adorable Cindy! I bet all the kids (and adults) love them!!
Thanks MaryAnn. I sent them into the school and the kids loved them.
Whoa is it Halloween treats tie already!!! These are so adorable… Such a clever idea
It is… I know that is scary. It always sneaks up on us so fast. Hope you like it!
Wow… this is incredible dear. I will definitely try this for my brother. I can imagine his face when he will see this cute lil spiders. 😛 He will definitely run from there. & the design you make with the webs is so pretty really. Loved it completely. Thanks for sharing this great sugar cookie recipe with all of us. Best wishes and Regards.
Thanks so much. Let me know if you try them, I would love to hear about it.
These cookies are so fun! I would love to make them with my nieces! Excellent Halloween recipe! 😉
Thanks so much! Your nieces will love them.
SO. Stinking. Cute. I mean seriously, these are beyond adorable. Totally need to try these out this year- just hoping they turn out as pretty as yours!
Love it. I appreciate that nice comment! It made me lol.